Sharing how to make this 8" x 8" card using the brand new Bee Crafty Flower Doodle stamps with the Dripping Skull Inkable and Texture Discs set 4. Sorry about the shadows on the pics, I started late at night and finished it the next day xxx
I stamped the Blooming Blooms and Dandedaisy flowers onto white card scraps with black versafine ink and left to dry.
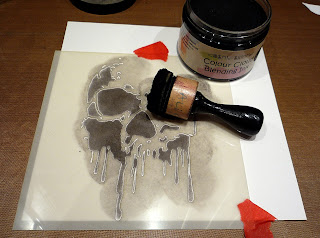
I cut a piece of white 300gsm card to 7 1/4" square and used masking tape to hold the Dripping Skull inkable. I applied black pigment ink with a blending tool and then a finer stencil brush to reach the thinner bits.
Carefully removed the inkable - ta da!!! Was really pleased with this - first go with this stencil 😎
Sorry about the shadows, it was a bit late.
I blended Hickory smoke distress ink around the card up to the skull and darker around the sides. Then darkened the edges with Black Soot distress ink.
Brushed Hickory Smoke distress oxide ink through the floral tile texture disc from set 4 in a few places.
Then brushed Black Soot distress oxide ink through the wavy texture disc in different sections.
Applied Black soot distress oxide through the dashes disc to add more texture.
Then had a marathon fussy cutting session in front of the tv, I cut a few more than I needed 😆
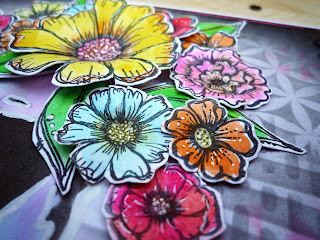
Used my watercolour ink pens on a white craft mat and painted the flowers using a damp brush. I used several colours on each flower - those next to each other on a rainbow (or colour wheel).
Positioned the flowers around the skull and took photos to see how they looked.
I added a little colour to the skull, peacock feathers and picked raspberry distress ink, lightly applied just to knock the white back.
Fixed the panel using pva glue onto pink card with a 1/16" border, then onto black card with a 1/8" border. And onto a white 8" x 8" card blank.
I cut out one of the words from the Bee Crafty Clear on black Transparency Prints, folded the ends and taped them around the back of a pink strip of card.
I took the flowers I needed, snipped between the petals and shaped them using a ball tool and a foam mat. Using the ball tool on the back of the flower in a circular motion will cause the petals to curl up. Turn the flower over and press the ball tool in the centre of the flower to shape it. I moulded the leaves too.
Used 3D glue gel to fix the flowers and leaves around the skull, referring back to the photos I'd taken earlier. Attached the sentiment using 3d foam pads.
I doodled a dash dot line around the card with a black fine liner pen.
Added a few sparkles to the centres of the flowers using a clear stardust gelly roll pen and highlights to the petals and leaves using a white gel pen.
These doodle flowers are so lovely to play with.
I deepened the colours on the skull, added a little black soot distress ink around the flower centres. Also stencilled a little picked raspberry distress oxide to the background.
I added a strip of white in the centre of the pink to make the word stand out more.
Finally I added a couple of black adhesive gems to the top right corner to balance the card.
I hope you have enjoyed this project and thank you for stopping by xxx
Products Used
6x6 Inkables Dripping Skull
Doodle Art Stamps - Blooming Blooms
Doodle Art Stamps - Dandedaisy
Inkables Texture Discs - Set 4
Distress Inks - Black Soot, Hickory Smoke, Picked Raspberry, Peacock Feathers
Distress Oxides - Black Soot, Hickory Smoke
Bee Crafty Clear on Black Transparency Sheets
Watercolour Pens - Zig Clean Color pens or Ecolines
Black versafine ink
Black pigment ink (could use black versafine instead)
White gel pen
Black Fine Liner pen
Applicator tool & foams
8" x 8" white card blank
Black, pink card for matting & layering
Also - scissors, pva glue, 3d glue gel, foam tape, blending brushes, paint brush, masking tape.


No comments:
Post a Comment